Section 5
Receipt Processing
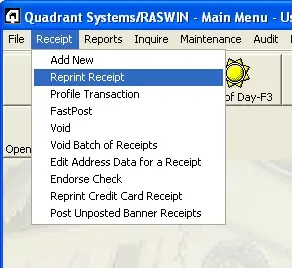
RASWIN supports several types of
receipt processing. These are all selected from the Main Menu.
|
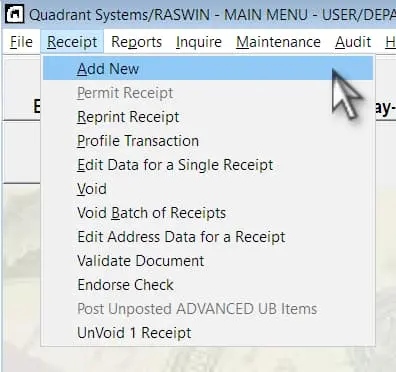
Add New
|
|
This is the normal receipt entry process. It
permits entry of accounting transactions, printing of customer
receipts, validation of documents, etc.
|
|
Reprint
|
|
Permits you to reprint a new copy of an existing
receipt.
|
|
Profile Transaction
|
|
This option permits you to efficiently process
receipts consisting of standard fee items - such as
remittances from other departments, building permits, etc.
These typically have a form-type format with pre-filled
lines containing the typical charges that department
collects on a regular basis.
|
|
FASTPOST
|
|
If you have purchased a license for the
FASTPOST module, this option permits you to quickly
posted barcode or OCR documents of a specific type - e.g.,
Utility Payments, Taxes, Etc.
|
|
Void
|
|
If your security level permits, you use this
option to void a receipt. When a receipt is voided, it is
not deleted from the system - rather it is marked as a
void so that it does not get included in your batch uploads
or your daily totals. There is an option to void a
batch of receipts based on a range of receipt numbers.
|
Add New
The sequence of steps is shown in detail. When you select the Add New
option, the system creates a "skeleton" receipt record (which will be completed
as the receipt process proceeds).
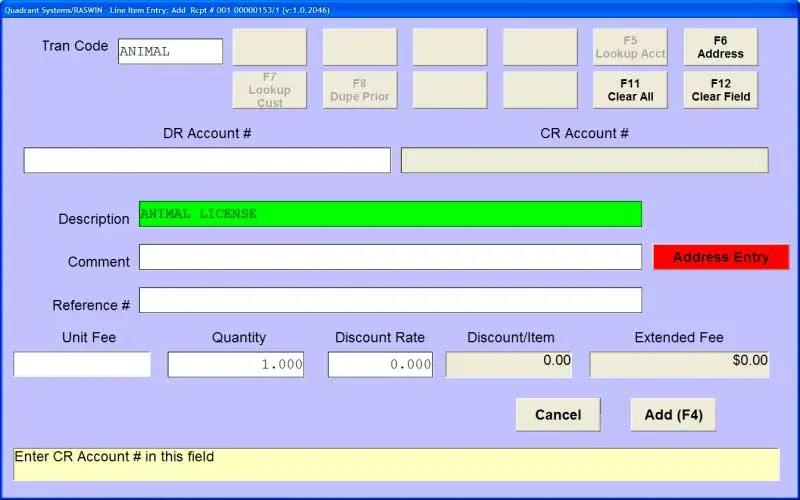
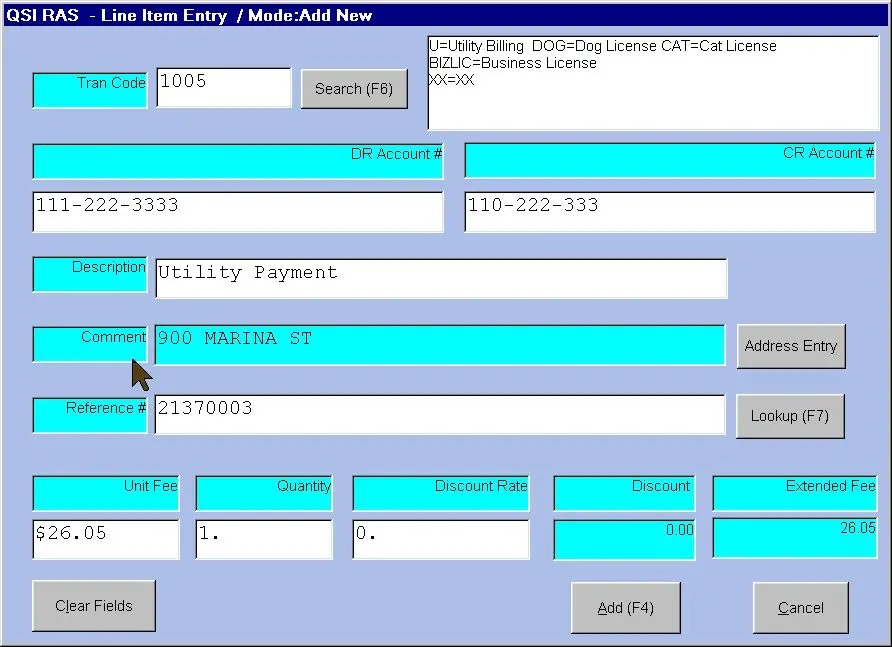
The initial line item entry screen will be displayed, as shown below.
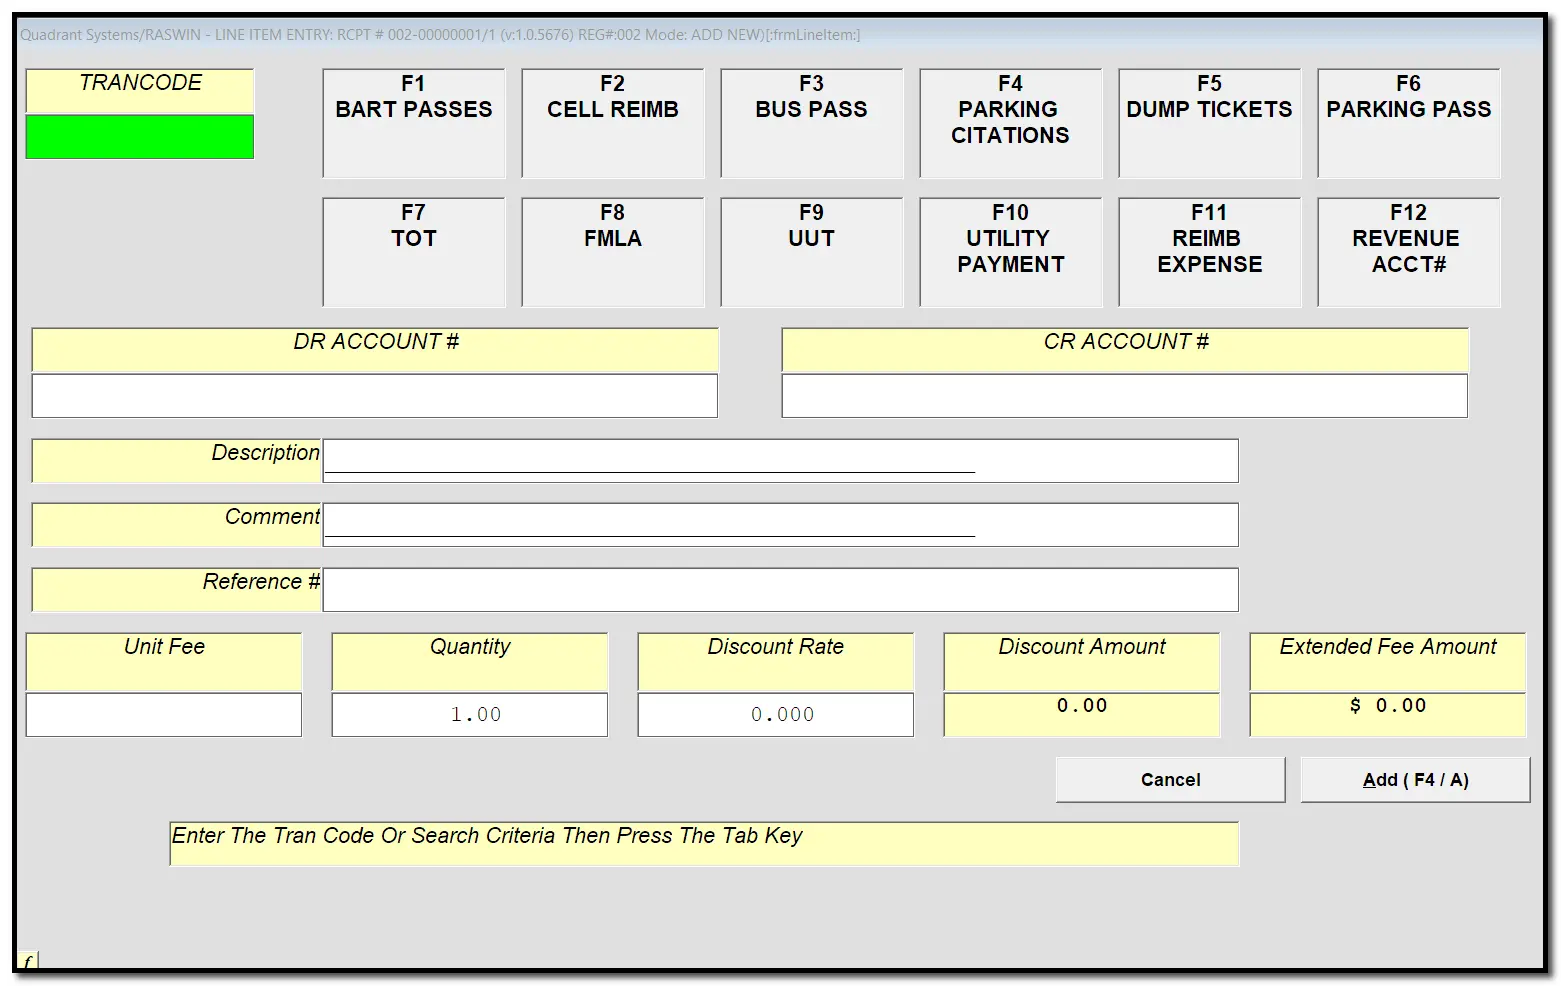
The
tran_code identifies each different transaction
type.
For example, one code may be used for
utility bill payments, another for
business license fees, and another for
building permits
and so on. After a
tran_code is entered, RASWIN
validates it in the
TranCodes table. Its
description and other related data drawn from the table will be displayed in
the various entry fields.
It will not take too long before you remember the most commonly used
tran_code[s], but sometimes there are several
hundred transaction types that you may be processing and it simply is not
possible to know them all. If you enter a
tran_code
in the entry field, but it is not valid, RASWIN will automatically branch to
the search screen.
If you cannot remember the
tran_code, enter a
single asterisk (
*) or
% sign and RASWIN will display a list of all of
those you are permitted to process.
If you enter a partial
tran_code
or
description a list of all the
tran_codes on file that match what you entered, if
any, will be shown in the grid at the middle of the screen. You
can scroll up or down (with the up or down
arrow keys,
Page Up and
Page Down keys, or the mouse )
this
list to find the
tran_code you want.
RASWIN will use the value you entered
to locate possible matching entries by searching in the
tran_code,
description, and
account
number
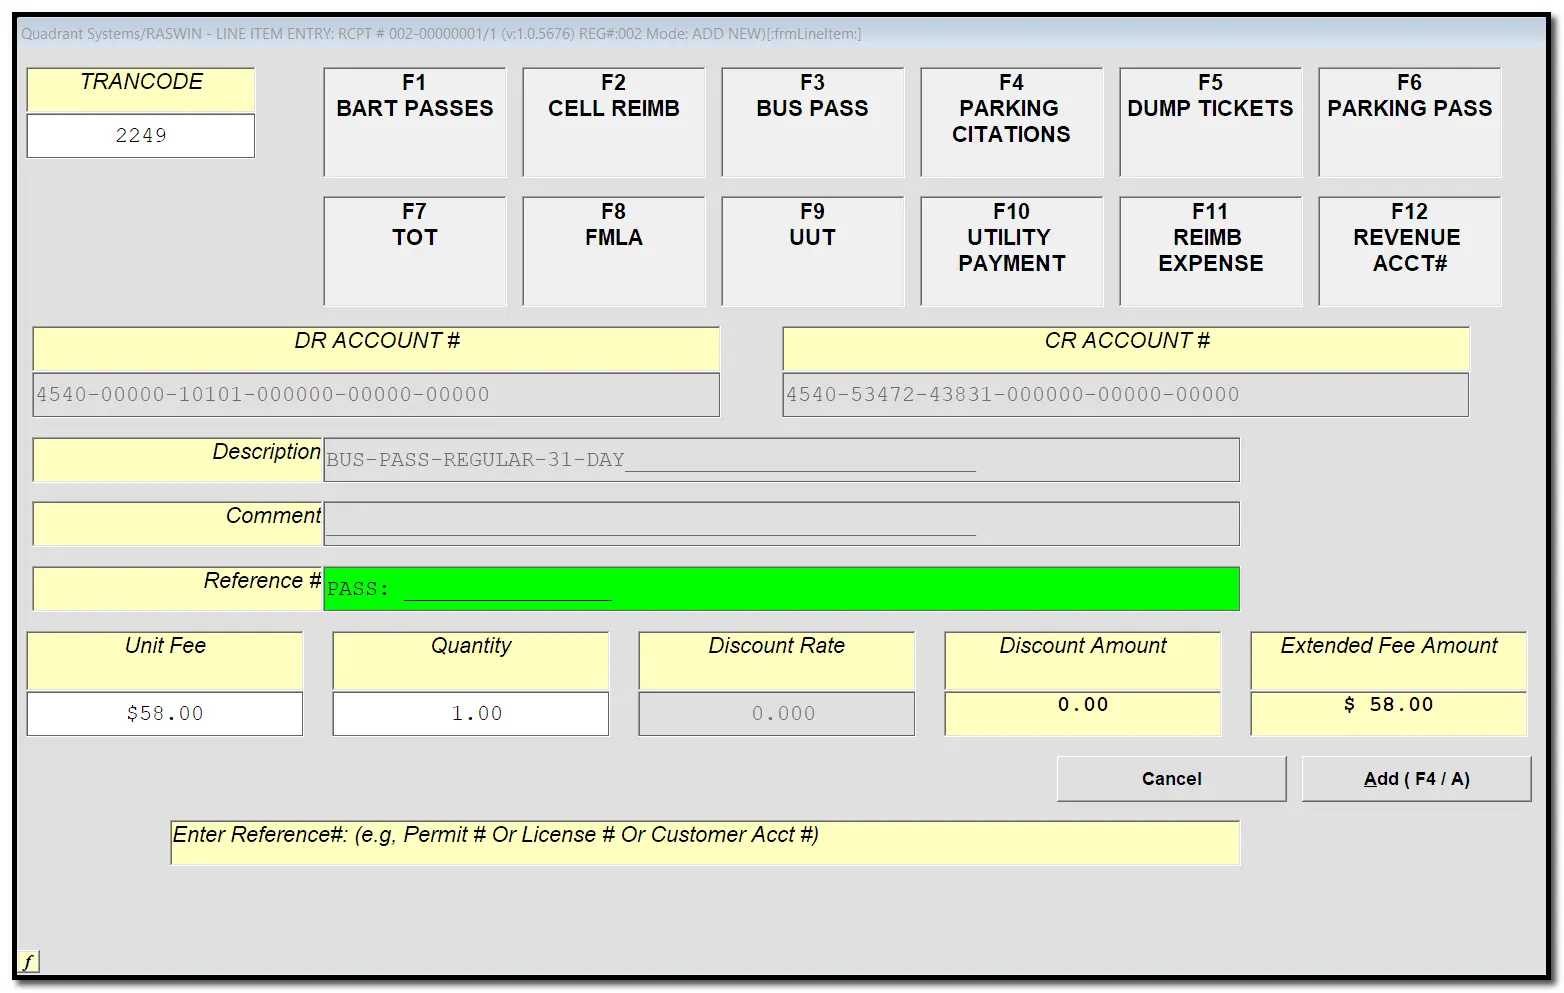
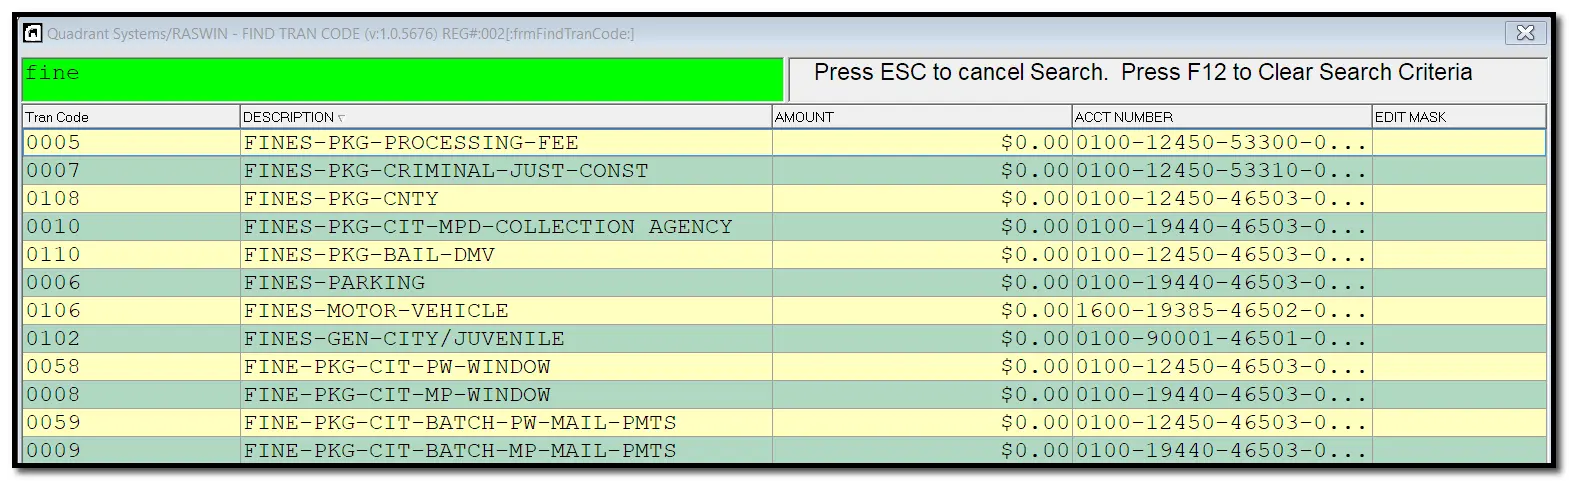
fields. A few examples are shown below:
Enter 005 to search for codes that begin with '005':

Enter
%12345% to search for account numbers that
contain
12450.
Enter
fine to search for descriptions that
start
with fine:
If
you
want to see ALL codes, simply enter
*. Once you have
put in your search criteria pressed
enter RASWIN will locate and
display all codes you are permitted to process. Access to
tran_codes can be restricted based on your security
level or department assignment.
Once the items are
displayed, select the one you want by double-clicking on the row, or
by clicking once anywhere on the row and pressing
enter. Once the row you want
is highlighted you can press
enter
or
double-click on the row to make your selection final. The line item
entry screen will be displayed again and the information related to
the selected
tran_code will be transferred back
to the entry screen.
Each
tran_code can be set up to control
entry of
fields such as transaction amount, account numbers, etc., in an
automatic or manual fashion. This is controlled by values set up in
the
trancodes Table

Account Number
The
account number field may be
several
segments or it may be a single segment, depending on the structure
of the account numbers used at your location.
Each
tran_code
in the
trancodes table has a field that
designates the format to use. Once a valid
tran_code
is entered the system
knows which format to use for the account number. This information
is used to control the account number entry.
It is also possible to have default values for one or more
segments of the account number. If some segments of the account
number are set up as default values, the system will display these
automatically and permit you to enter the portion(s) of the number
that you need to enter.
Description
The description field is often used for
information other than the standard transaction description. For
example, you might capture a building permit number or other related
account number in this field.
Comment
The comment field can be used to add additional
information about the receipt item.
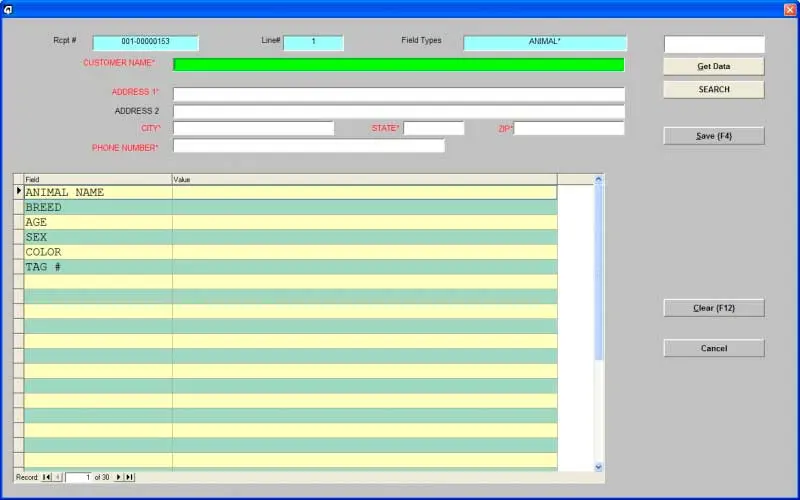
Address Entry (Supplemental Data Capture feature)
If the
transaction code is set up to permit it, you will see an "Address
Entry" button to the right of the comment field.
You can click on this
button to display the address entry screen. The specific fields of
information you will need to enter will be displayed as shown below.
Each transaction code can have a different set of data fields
associated with it. This is defined in the system tables.
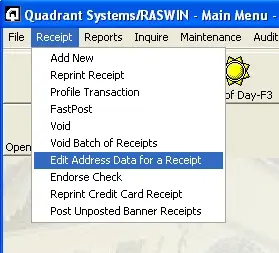
Once the data is added
to the database you can edit it via the
menu option.
You can also use this function to add address data to an existing
receipt if you forgot to do it while entering the receipt the first
time, but only for
tran_code that are linked
to a set of field data via the
field_types setting in the
trancodes
table record.
Reference Number
The
Reference # field is
used for information such as the customer account number for a utility
payment, or a tax account number for a tax payment, a business license
number for a business license, etc.
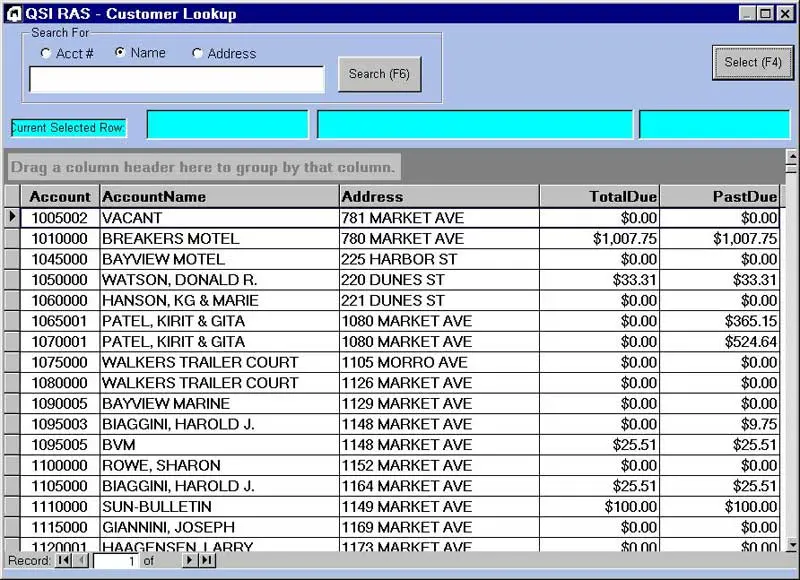
If you have access to a host system (either online or via an off-line
lookup file) you will see a button to the right of this field labeled
Lookup {F7}. If you press this
f7, a list of customer accounts
associated with your master file will appear, as shown below.
If you have documents such as utility bills with a scannable account
number you can set them up to permit you scan in the document in the The
Reference # field and then verify the account number
and balance via the Customer lookup function. To see how to do this refer to
the
Scan Line Setup section of the manual.
To search for a
specific payer, enter the name, as shown in the following display:
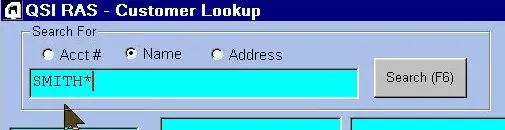
For example, to
search for all payers named SMITH, enter The
SMITH*.
To look for all accounts on a specific street name, enter
*MARKET*, click the address option button, then
press
enter to search for the matching
entries.
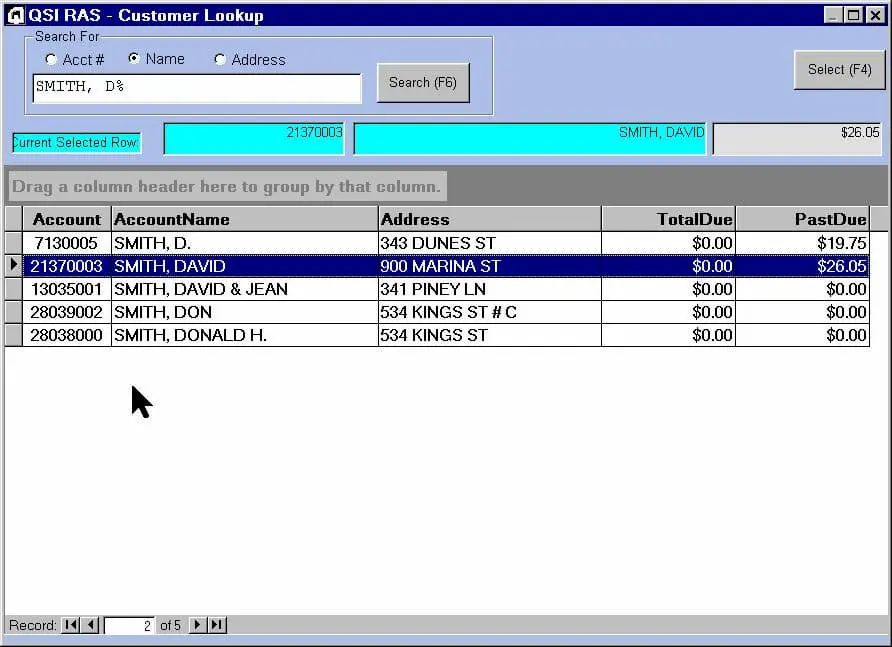
Click on the
row for the item you want to process a payment for. then press
f4 to select that row RASWIN will
carry back the information to the line item posting screen.
 trancodes
 table.
Quantity
The
quantity field will always be
assumed to be
1, but you can override this by
entering a different value. This permits you to sell some items (such as
copies, or other merchandise , rounds of golf, and so on) by indicating how
many the customer is purchasing. Most of the time you will just press the
f4 key add the item currently
displayed on the entry screen to the receipt.
RASWIN will return to the basic entry screen and the item will be added
to the line item information and returned to the receipt summary screen, you
will be ready to process payments, or add more line items.
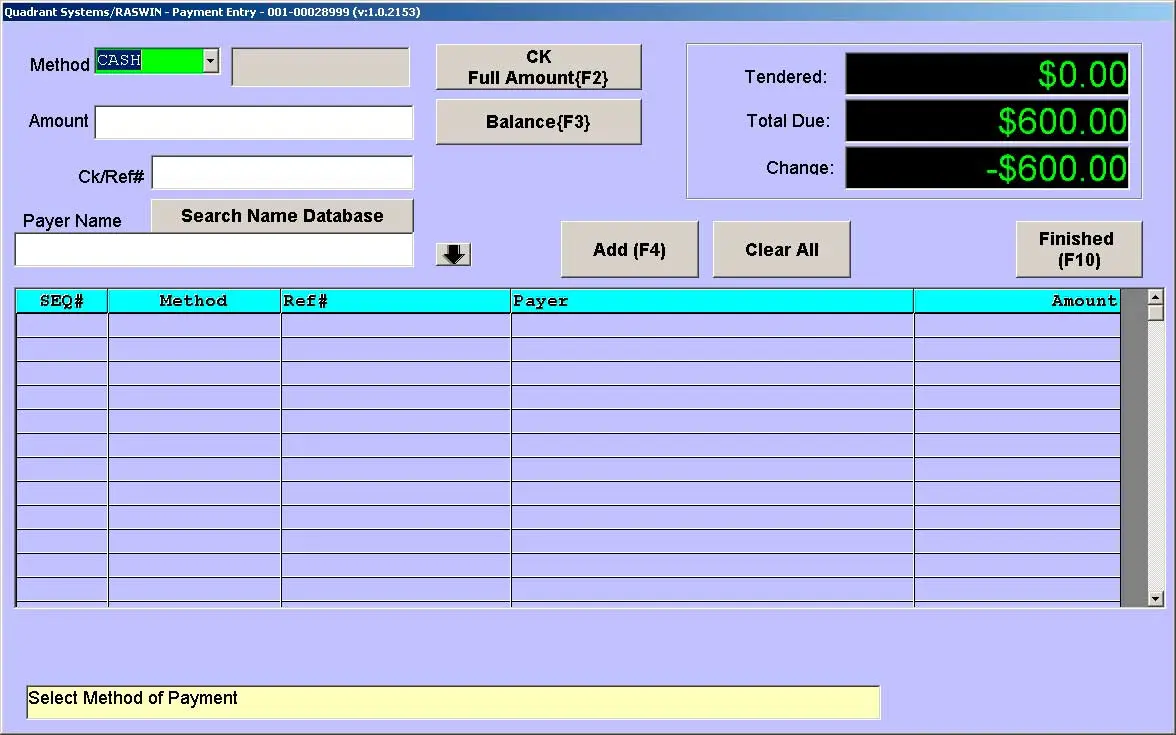
Press
f6 to go to the payment
entry screen. The
amount due will be shown at the
top right portion of the screen.
If you need to change the
payment method you can
click on the down arrow on the drop down box and select a method from the
list of option shown. These are defined for your system when it is first set
up via the table maintenance functions.
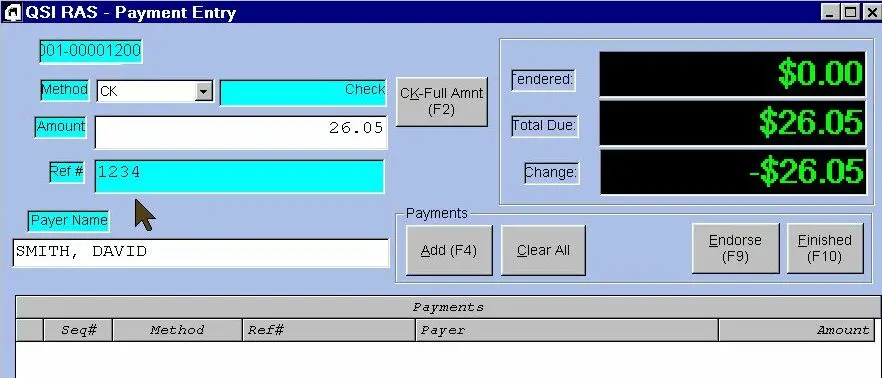
If you are processing a
check for the full amount,
you can simply press
f2 RASWIN
will assume these values automatically and will then position the cursor at
the
reference # field, as shown below, where you can
enter the check# or other value.
If a customer name was carried forward from the lookup screen or via
an on-line interface process
but someone else is making the payment, you
can enter the alternate payer name manually.
There are two other options for entry of the payer name value.
1. You can enter a list of names into the
Customer_Names table via Table Maintenance, then
during payment entry you can select a payer from the list you have entered.
2. You have enter a list of payer name codes into the
Payer-Names table, a sub-table of the
MICSPARMS table, and then select from these names
using a drop down list available on the Payment Screen.

Press
f4 to add the payment to the
Payments grid display.
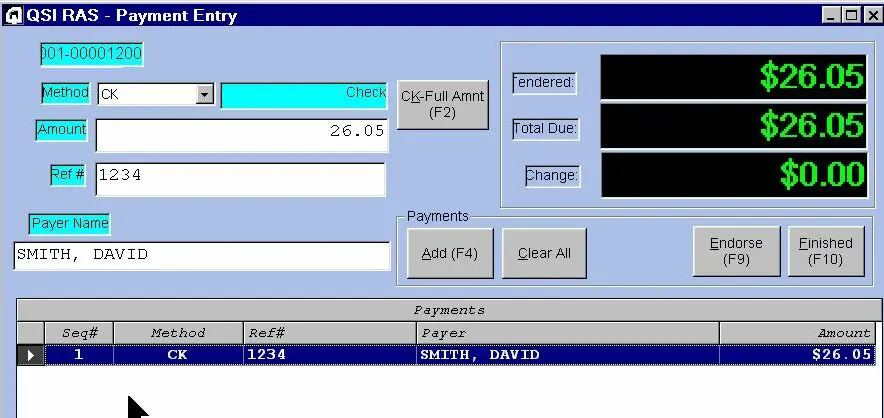
Once enough funds
have been tendered to cover the
total due on the receipt RASWIN will not let you add additional payments. In
the even
that you try to do this, a message will appear advising you that additional
payments are not allowed.
You can then you can print the check endorsement
on the check with the receipt printer by
pressing the PRINT button.
If the check has already been endorsed (for example,
with a hand stamp in another department prior to posting the receipt) you
can simply press
esc when the
preview screen is displayed to skip the endorsement step.
RASWIN will display the payments list and recalculate the
amount still due (if any). If the amount is enough to cover the total fees
due, you can press
f10 to return
to the main receipt entry screen.
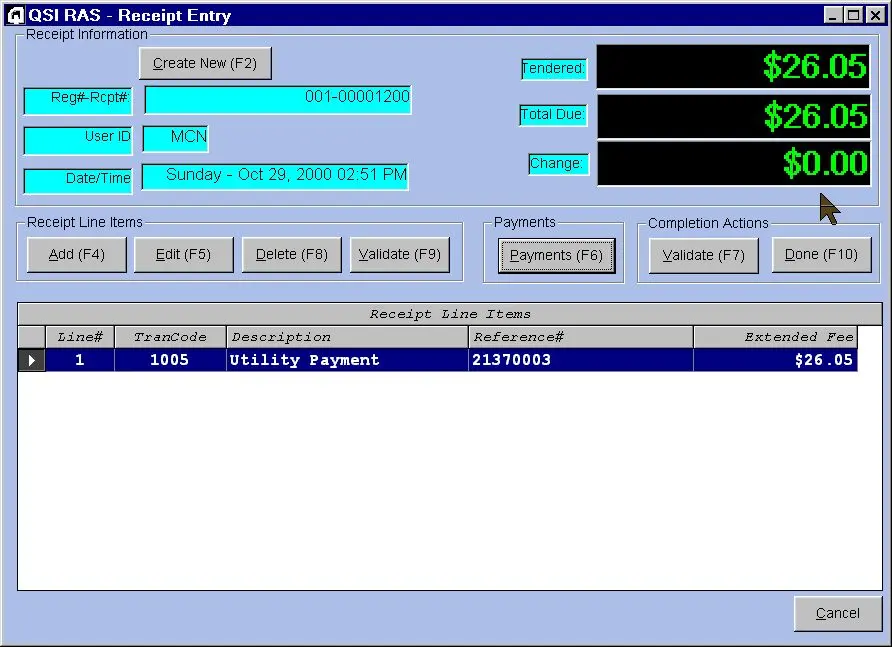
If enough payments
have been processed, you can
press
f10 to complete the receipt.
This will add the item[s] to the database and present you with the option to
print a customer receipt.
If you want to continue, press
f9 and RASWIN will prepare a
temporary image of the receipt and display it in a preview window. You can
adjust the the data to the receipt printer.
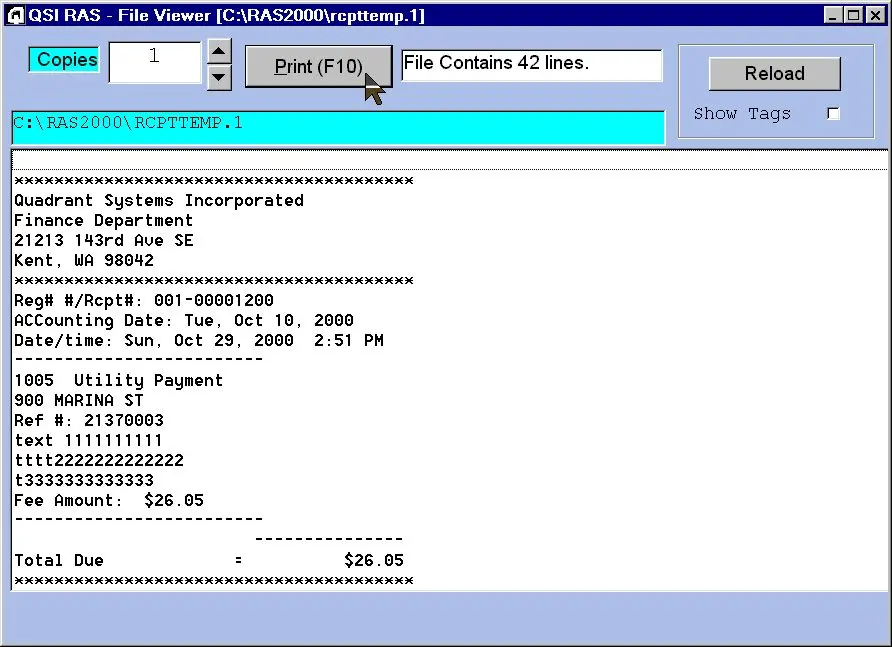
Reprint Receipt
If you want
to print a copy of a prior receipt for
any reason you can also do so with this function.
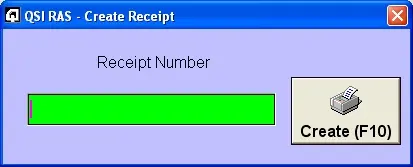
RASWIN will display the selection screen
where you enter the
receipt number of the receipt you want to print.
Profile Transactions
A profile transaction permits you to
efficiently process receipts that contain multiple items - for example,
building permits or receipts submitted by other departments on remittance or
transmittal forms. Typically, these types of documents contain a pre-printed
format that the user fills out with specific fees collected on each line.
There are fee items (trancodes) and descriptions on these
forms and blank spaces where the user fills in an amount for fee
which had activity during that reporting period (usually daily).
The profile transaction is defined in the
PROFILE TRANSACTIONS table to mirror
the items that appear on the
form. By setting up transaction codes that relate to each possible line
item, your are able to select one of the profile transaction types
from a list presented to them when they select the profile transaction
option, as shown on the screen below.
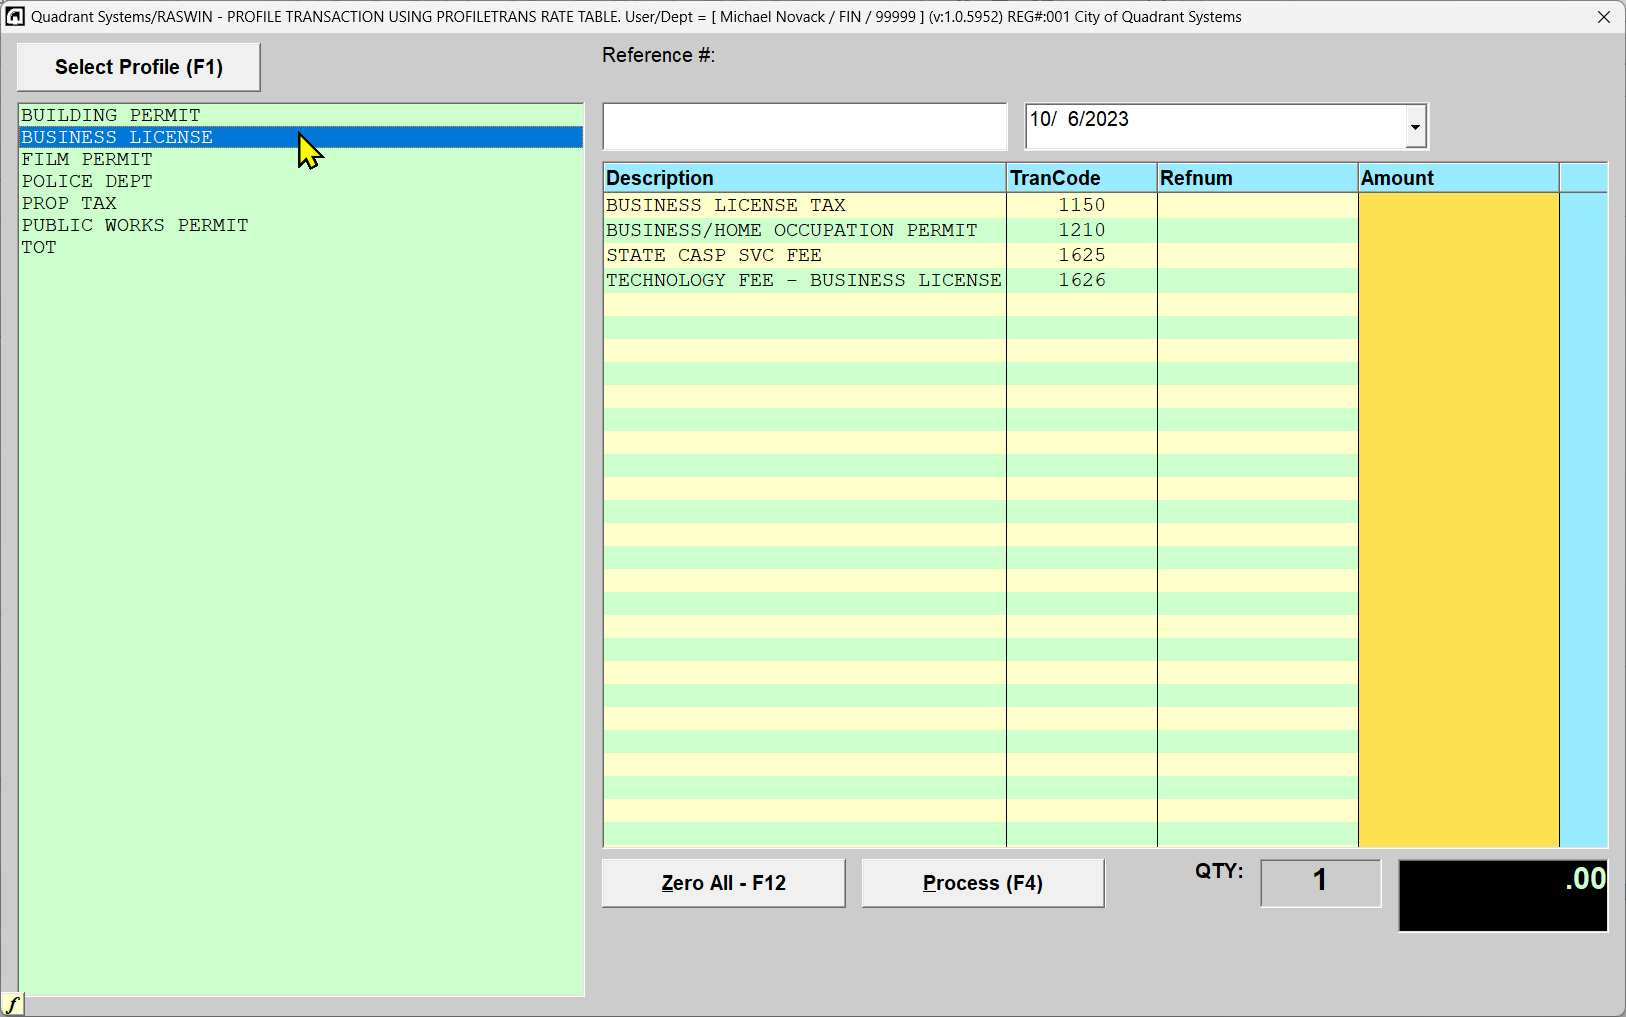
When you click on one of the
defined profiles, the
transaction types that are associated with that profile are displayed, as
shown below. NOTE: The
PROFILE TRANSACTIONS table contains a
SEQUENCE_NUMBER column
that causes the items to appear in the same order as they do on the your
form[s]. In addition, it contains a
DEPT_CODE column
that limits access to the defined profiles to those users who are assigned
to that specific department.
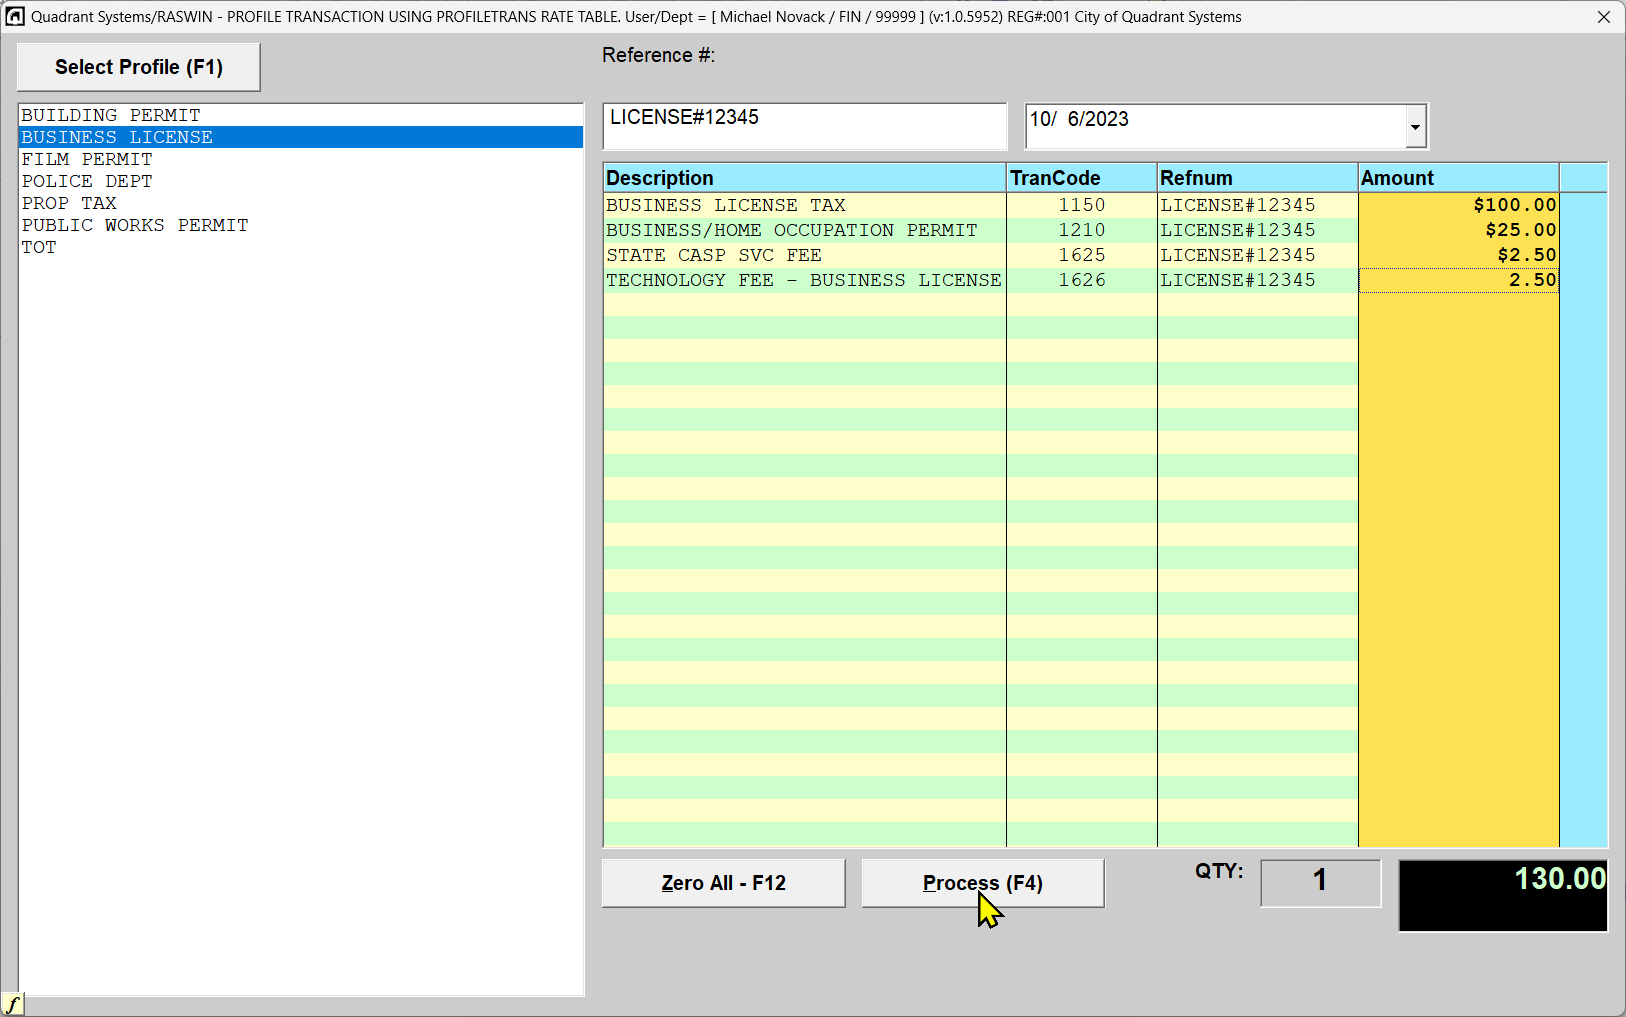
You should enter a reference number, such as a permit number or a remittance
control number (numbers or dates) that appear on the source document. This
should be done so the transaction can be audited back the source
documents at a later time if this should be required. The entered reference
number will automatically carry down to each line on the profile
transaction, but can be individually edited, if need be.
You can also set up an EDIT MASK for each profile transaction, if
needed. The EDIT MASK entries themselves are stored in the
EDIT MASKS
table and operate just like an edit mask for a standard
line item entry. The links between specific Profile Transactions and the
edit masks table are stored in the
miscparms
table, and initially created
the first time the PROFILE is first used. By default, this is set to
none. To use a specific edit mask you will need to
create one via table maintenance.
You then enter the fee amounts
being posted. If a line item is not to be paid on this receipt (no funds due
for that particular fee) just leave it blank or enter
0.
As you move from one line to
the next, the total amount due on the document will be recalculated.
Assuming that you have entered all the items correctly, the total should
agree. Of course, this assumes the source document has been added correctly
by the department submitting ... and this is not always a valid assumption.
If you don't get the same total, simply go back to the top of the list
and check your entries one by one for any entry errors - just re-enter the
correct numbers where needed.
When you are satisfied that your entries are correct, click the
Process button, or press
F4
RASWIN will
create a new receipt header automatically and display the items you just
entered on the Profile Screen on the receipt summary screen.
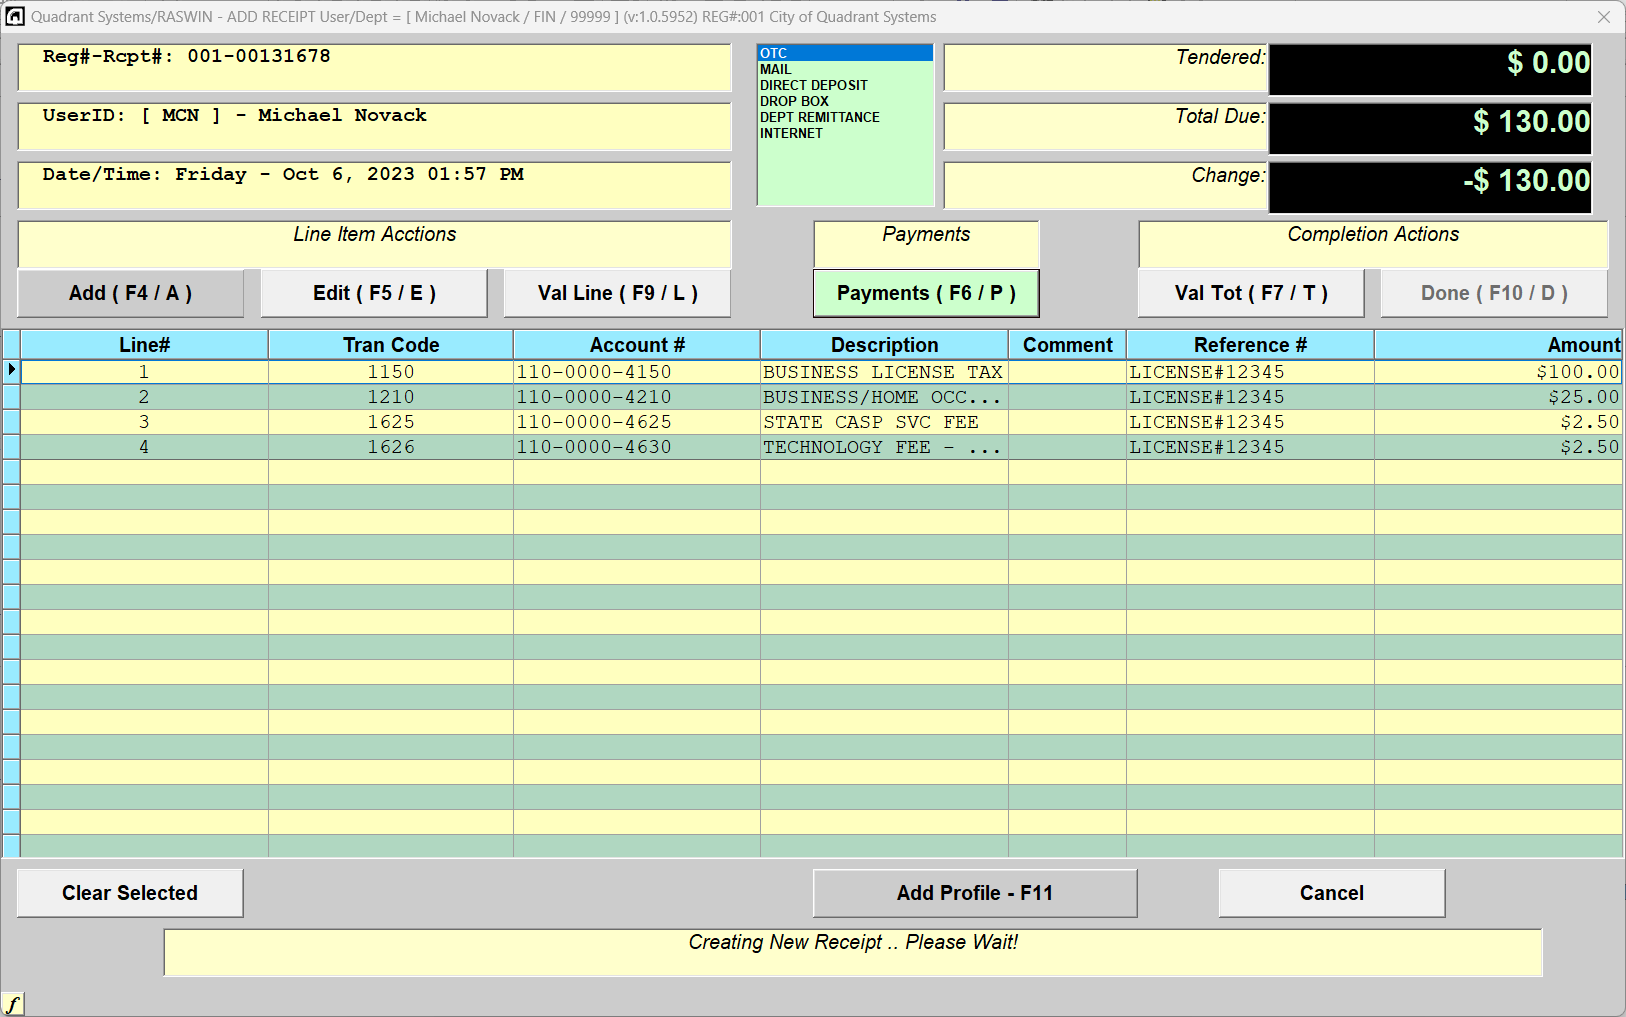
From this point, you can add another Profile Transaction (F11), add addition line items
(F4), or proceess Payments (F6).


